Independent beginner guide 6 steps · About 10 minutes

EffectCraft Tutorial: Make Your First Animated Title

This EffectCraft tutorial for beginners builds one thing, end to end, in about ten minutes: a four-second animated title.

You will create a 1920 × 1080 composition at 30 frames per second, add a text layer, keyframe its Position so it slides in from the left, ease the movement with F9, save an editable project, and export an MP4 you can play outside the app. The exercise needs no footage, no plug-ins and no templates. If you have used After Effects, the panels, menus and shortcuts will already feel familiar — EffectCraft follows them on purpose.

Written against the builds published in October 2026. EffectCraft is young software: if a control has moved since, follow the panel and property names rather than screen positions.

01 / Get ready

Before you begin

A short exercise. No footage, plug-ins, or templates.

Canvas1920 × 1080
Frame rate30 fps
Duration4 seconds
Output.ecproj + MP4

Get EffectCraft from the official product page or its GitHub releases page. Both the ArtCraft Launcher and standalone installers are published there; pick the build for your operating system. Installing a package is outside this exercise — this guide starts with the app already open. If you need help choosing a file or checking its SHA-256 hash, follow our EffectCraft download and install guide.

Make a folder called effectcraft-first-title somewhere you can find again, and keep the project and the video in it under different names. Beginners mix the two up: the .ecproj file preserves layers and keyframes, the MP4 is the video you play or share. Do not look for an After Effects file to start from — .aep, .aepx, .mogrt and .ffx files cannot be read or opened today (gap assessment).

Pick a short title such as HELLO MOTION and a system font. Choose a text colour that reads clearly against the composition background; you do not need to add a background layer for this exercise. Expect small differences between builds — EffectCraft’s interface matches After Effects for the shape of its menus and panels, but panel placement and feel are still being finished.

What you will make: a 1920 × 1080 composition, 30 fps, four seconds long. A short title starts off the left edge, moves to the centre during the first second, and stays there. These values are choices for this exercise, not the only correct ones — change them once your first export works.

02 / Follow along

From blank canvas
to playable video.

Work through these in order. Each checkpoint tells you what to look for before moving on.

01
A four-second canvas

Step 1: Create a composition (1920 × 1080, 30 fps)

Start a new project, then create a composition. Name it First Title and set its width to 1920 pixels, its height to 1080 pixels, its frame rate to 30 fps, and its duration to four seconds. A short duration keeps the whole movement easy to check frame by frame.

Three panels carry the rest of this EffectCraft tutorial:

  • The Project panel holds the composition as an item.
  • The Composition panel (the viewer) shows the frame at the current time.
  • The Timeline places layers against time and lists their properties.

Those names follow After Effects, and so do the shortcuts used below. If a panel is not where you expect it, find it by name rather than by position — docking, workspaces and multi-monitor layouts are still being finished (UI parity).
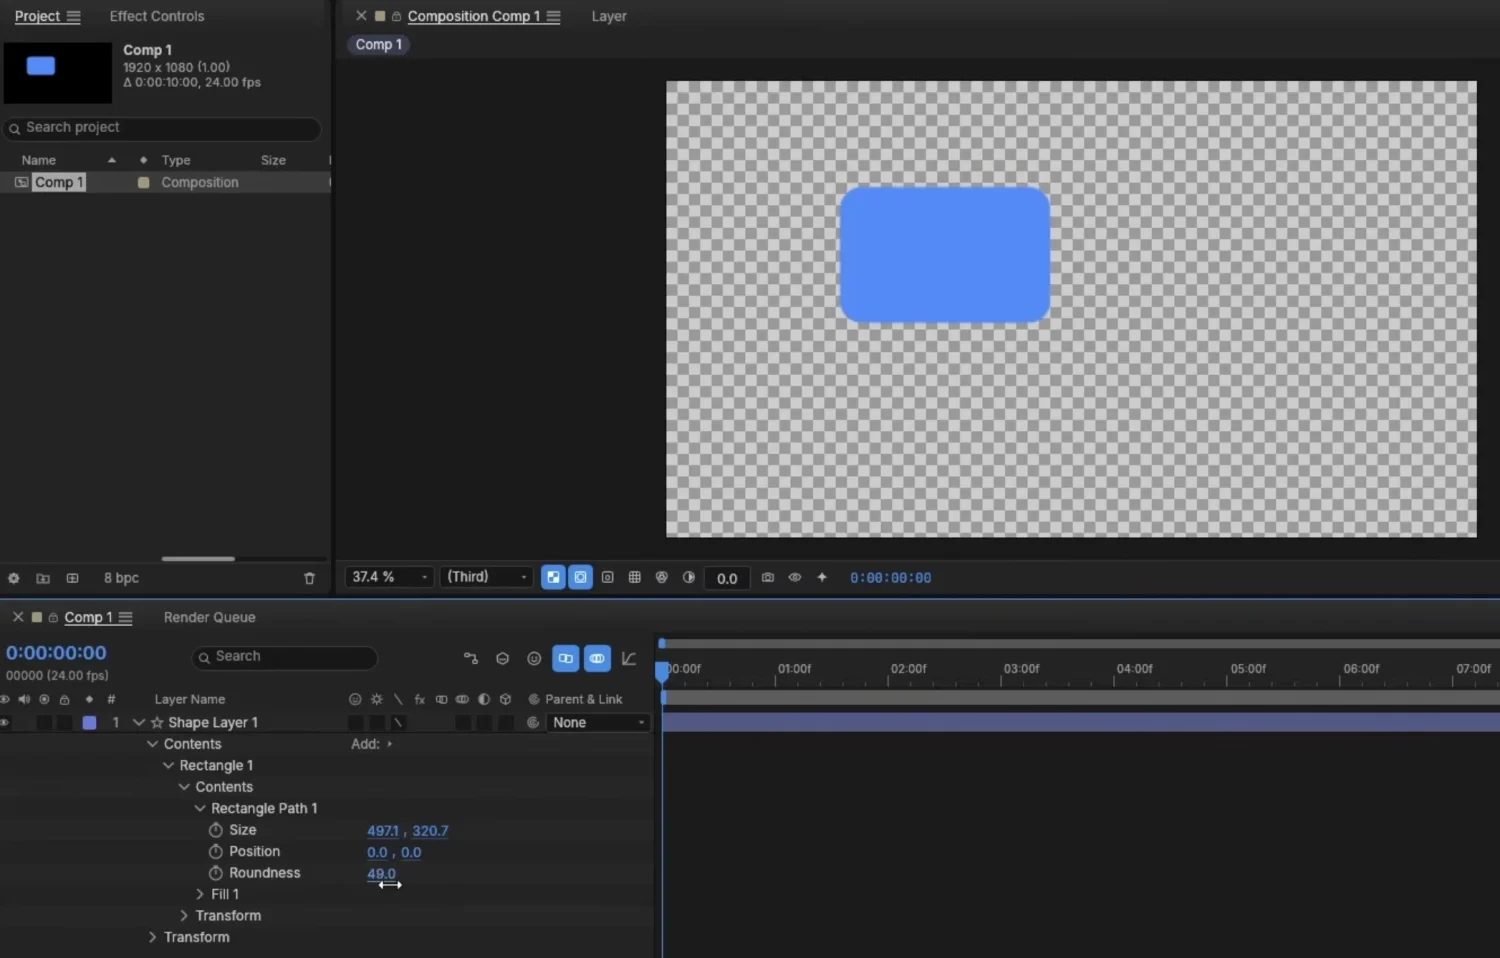
EffectCraft composition workspace with the Project panel on the left, Composition viewer above, and Timeline below
Find the Project, Composition, and Timeline panels here. This separate example shows 24 fps and a 10-second composition; use 30 fps and four seconds for this tutorial.
Checkpoint

the Composition panel shows a 1920 × 1080 frame, and the Timeline reads 0:00 at 30 fps.
02
One readable text layer

Step 2: Add a text layer and position it at one second

Add a text layer to First Title and type your title. Then select that layer and look at the Properties panel — for a selected text layer it shows the layer’s transform along with its font and paragraph settings.

Move the time indicator to one second, then put the title in the centre of the frame. You can drag it with the viewer handles or set values on Position. Numeric fields are scrubbable: drag across a value to change it, type a number to set it exactly, press Tab to move to the next field, and Escape to cancel an edit. The rest of this EffectCraft tutorial uses that centred position as the end of the animation.

Press P with the layer selected to reveal Position in the Timeline; press P twice (PP) to show Position alone and hide every other property. If you add more layers later, rename them with Enter or a double-click so you always know which one you are selecting.

Checkpoint

one text layer named HELLO MOTION, readable against the background, sitting in the centre — and no keyframes yet.

03
Two Position keyframes

Step 3: Keyframe the entrance (Alt+Shift+P)

With the text layer selected, move the time indicator to the start of the composition and press Alt+Shift+P (Option+Shift+P on macOS) to set a Position keyframe at the current time. The same modifier pattern works with A, S, R and T, exactly as in After Effects.

Now push the title off the left edge: press the left arrow key to nudge one pixel, or Shift + left arrow for ten pixels. You need no exact coordinate here — the only requirement is that the whole title sits outside the frame at zero seconds. Judge it in the viewer rather than copying a number from this guide.

Move the time indicator to one second and put the title back in the centre. That creates the second keyframe, and the Timeline shows an animated Position property between the two.

Why the path may curve. Between two Position keyframes the spatial tangent defaults to auto Bezier — the same behaviour as After Effects — so the title travels along a slight arc instead of a straight line. If you want a straight path, set the spatial interpolation to Linear in the Keyframe Interpolation dialog.

Read the values, don’t judge by scrubbing. Slow scrubbing is a known rough edge (#329) and is not evidence that your keyframes are wrong. Check the Position numbers at 0s and 1s instead, or press Spacebar / Numpad 0 to play the preview.

Checkpoint

two Position keyframes, at 0s and 1s — the title starts fully off-screen on the left and rests centred.

04
A smoother entrance

Step 4: Ease the movement with F9

Select both Position keyframes and press F9 for Easy Ease. The entrance should now accelerate away from the first keyframe and decelerate into the centre instead of moving at a constant rate.

To change how long the entrance takes, drag the second keyframe later to lengthen it or earlier to shorten it. The interpolation set matches After Effects — linear, Bezier, hold, auto and continuous Bezier, roving keys — with Keyframe Velocity and Interpolation dialogs for finer control.

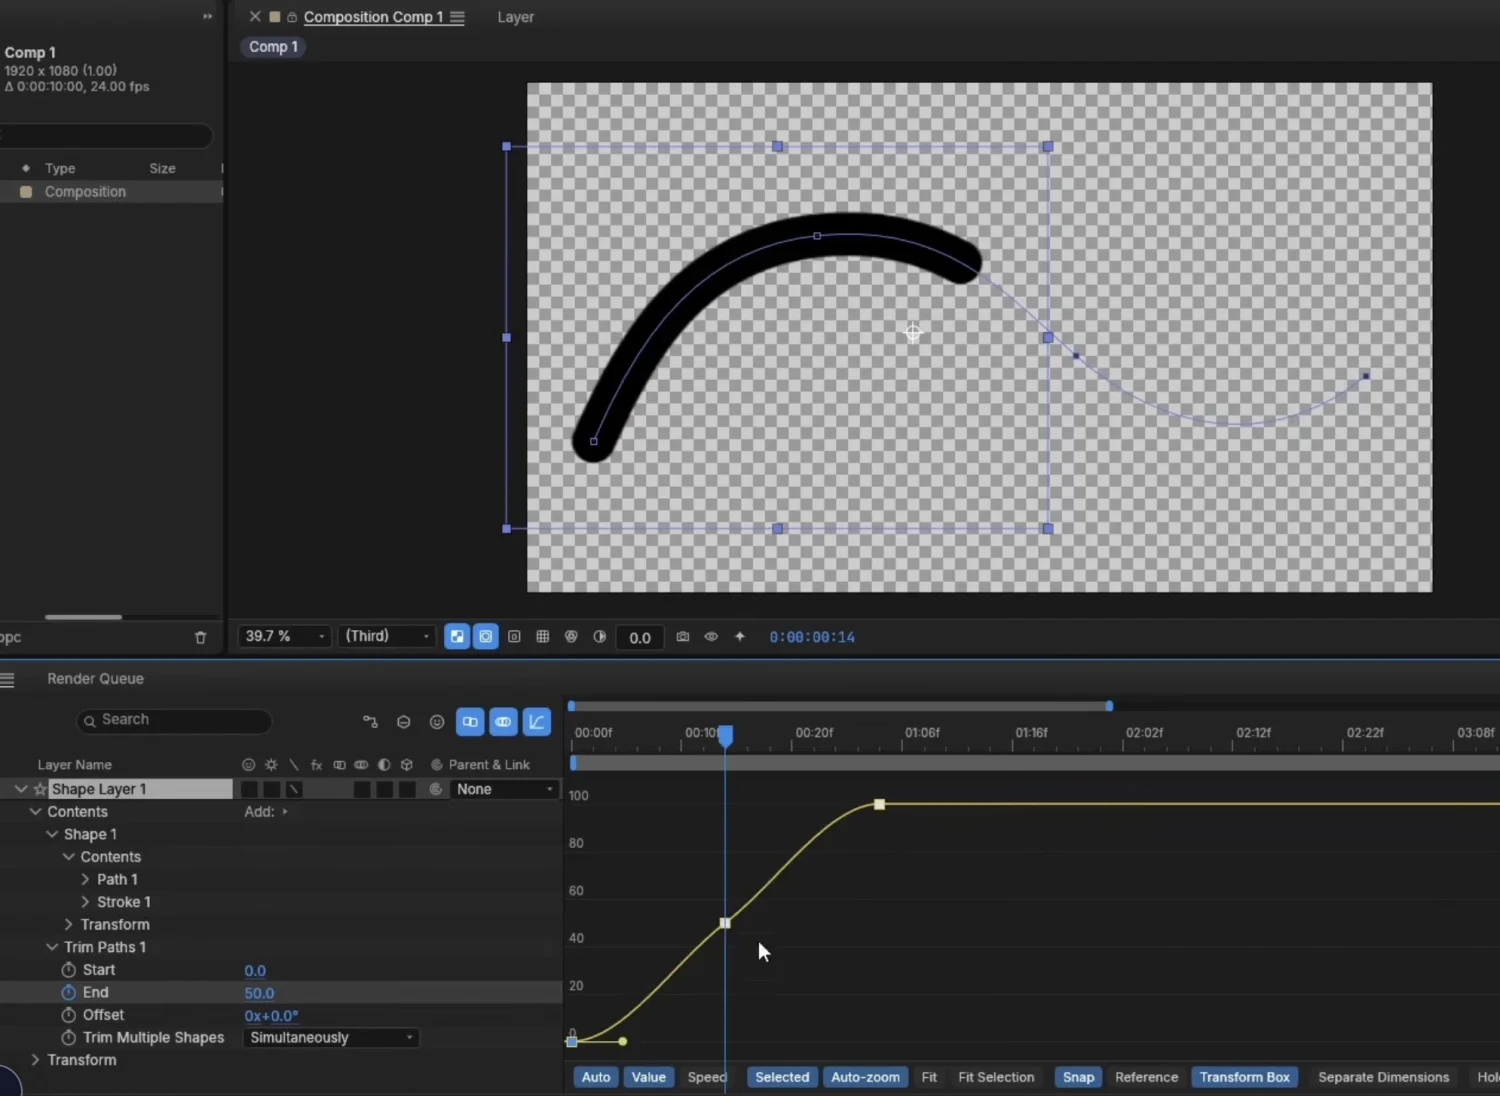
The Graph Editor shows the same motion as value and speed curves with draggable handles, and its button bar carries hold, linear, auto Bezier and Easy Ease buttons. It is the better place to shape a curve by hand; F9 is simply the fast route.

A preview caveat worth knowing before you judge the easing. The project estimates preview feel at 55% (UI parity). Users report stutter on cached frames (#595, #304), lagging scrubbing (#329) and audio that arrives late or crackles (#554, #504, #335). Choppy playback is the known behaviour, not a sign that your easing failed. Use Spacebar or Numpad 0 for RAM preview, and lower the preview resolution if it helps.

EffectCraft Graph Editor showing an eased keyframe curve for the End property of a shape layer's Trim Paths effect
The Graph Editor shows how a value changes between keyframes. This separate example animates a shape layer’s Trim Paths End value; in this tutorial, ease the text layer’s Position keyframes.
Checkpoint

two eased Position keyframes, and the title enters, settles, and holds still for the remaining three seconds.

05
Keep the source

Step 5: Save an editable project (.ecproj)

Save the project into your practice folder as first-title.ecproj. EffectCraft projects are versioned JSON, so they diff cleanly in version control — a project file you can open in a text editor, which a binary .aep is not.

Reopen the file once as a confidence check: the composition, the text layer and both Position keyframes should all still be there. Saving and exporting are two separate steps: the project is what you edit later, the MP4 is what you play or send. Rebuilding a four-second animation is cheap; rebuilding a client’s three-minute one is not, which is why the save comes first.

Because the project is plain text, its properties can also be edited through the command-line interface.

Checkpoint

first-title.ecproj exists on disk, and reopening it shows the text layer with both Position keyframes intact.

06
Play the final file

Step 6: Render an MP4 and inspect the result

Send First Title to the Render Queue, choose an H.264 MP4 output option, and set the destination to first-title.mp4 inside the practice folder. Before you start the render, check three things: the composition queued is First Title, the output path is the folder you meant, and the duration matches what you animated.

A render that finishes is not automatically the render you meant to make, so open the MP4 in an ordinary video player once the queue reports completion, and check three things: the first frame does not show the centred title, the title travels into view, and it is still visible on the last frame. Check the dimensions and length if your player shows them.

H.264 MP4 is the default answer for sharing; the queue does more than that. If your next project needs a different output, this is what is available today (README):

What you needChoose
Send it to someone, post it onlineH.264 MP4 — what this tutorial uses
Transparent background, layered over other footageProRes 4444 XQ (with alpha) or WebM (VP9 with alpha)
Animation inside a web page or an appLottie JSON — see below
Frames for someone else to finishPNG, JPEG, TIFF or 32-bit EXR sequences
A small looping clip in a chat windowAnimated GIF

Two things worth knowing about the queue, according to the README. Every encoder in it is pure Rust — FilmCraft’s H.264, ProRes and AAC, plus EffectCraft’s own VP9, AV1, HEVC and Opus — and there is no FFmpeg inside. And the same queue runs from a command line, so effectcraft-cli render --comp "First Title" --out first-title.mp4 can render from the command line once the project is saved.

Checkpoint

first-title.mp4 plays outside the app, holds the title on its last frame, and is four seconds long.

03 / First checks

Troubleshooting

Check the project state, preview and queue settings.

SymptomWhat to check
The title is not visibleIs the layer inside the composition, does its duration cover the current time, and does its colour differ from the background?
The viewer looks emptyIs the Composition panel showing First Title, or another composition item?
The title never movesSelect the layer and press P: Position should show two keyframes with different values. Two keys at the same time give no movement at all.
It jumps instead of travellingCheck whether a keyframe uses Hold interpolation; switch it to a moving interpolation, then select both keyframes and press F9 for Easy Ease.
It travels in a curveThe default spatial interpolation between Position keyframes is auto Bezier. Switch it to Linear in the Keyframe Interpolation dialog for a straight path.
F9 does nothingCheck which panel has focus. The Keyboard Shortcuts editor (Settings) can rebind keys and save sets, so a key may not behave as documented on your setup. Adding shortcuts has a known failure on Linux (#467).
Preview stutters or scrubs slowlyKnown issues (#595, #304 stutter; #329 scrubbing). Play with Spacebar or Numpad 0, or lower the preview resolution.
The render is blankConfirm the composition you queued is the one you animated, then check the Render Queue settings.
The file is not where you expectedRecheck the output path in the queue; check free disk space and the render log — the queue reports storage overflow.
The export does not match the previewRecord the EffectCraft version, operating system and export settings before filing it on the issue tracker. Colour differences have known causes, including 32-bpc blend modes and the working gamma (#494, #495).
Everything looks different from this guideCheck your version on the releases page, then find controls by name rather than position. The project estimates roughly 65% overall UI parity with After Effects, and feel differs most on Linux and Windows (UI parity).

04 / Work faster

Shortcuts used in this tutorial

KeyAction
PReveal Position
PPShow Position alone, hide other properties
TReveal Opacity
A / S / RReveal Anchor Point / Scale / Rotation
U / UUReveal keyframed / all properties
Alt+Shift+P (macOS: Option+Shift+P)Set a Position keyframe at the current time
F9Easy Ease the selected keyframes
← / Shift+←Nudge 1 px / 10 px
Alt-dragDuplicate a layer
Ctrl+backtickTwirl selected layers open or closed
Spacebar / Numpad 0Play the preview
Enter or double-clickRename a layer

The full property set is A, P, S, R, T, M, F, E, L and U, with double presses (AA, PP, SS…) showing a single property. Hold Shift to add properties to the selection (README).

05 / Common questions

Frequently asked questions

Do I need After Effects experience for this EffectCraft tutorial?

No. Every step explains the panel, layer, property or keyframe it uses. If you have used After Effects, you will find the panels, menus and shortcuts follow it on purpose, so your muscle memory carries over — the project estimates roughly 65% overall UI parity with After Effects, and 75% for the Timeline (UI parity). You need no Adobe project, subscription or plug-in.

Can I follow an After Effects tutorial in EffectCraft instead?

Mostly, with three exceptions. Panels, menus, shortcuts and keyframe behaviour follow After Effects, so most beginner AE tutorials transfer. What does not transfer: .aep, .aepx, .mogrt and .ffx files cannot be read, After Effects plug-ins do not run, and .ffx preset reading is out of the project’s clean-room scope — not merely unfinished (gap assessment). Expressions and scripts do carry over, because the object model is implemented. Our EffectCraft vs After Effects comparison explains the compatibility limits before you try to follow an AE-specific lesson.

Does EffectCraft have templates and presets?

It ships a template gallery and interactive Learn tutorials in the app itself. Presets are thinner: 31 original .ecpreset files against the 621 .ffx presets After Effects bundles (gap assessment), and it reads only its own format — so an .ffx preset you rely on has no direct import path here.

Why do I need to save the project and render a video?

They are different things. The .ecproj file keeps the layers and keyframes so you can change wording or timing later. The MP4 is the finished file you share. Saving before you render means a new idea costs a file edit rather than a rebuild.

Does EffectCraft export transparent video?

Yes. ProRes MOV exports reach 4444 XQ with an alpha channel, and WebM exports carry VP9 with alpha and inter frames. Both are options in the Render Queue’s Output Module.

Can I preview the animation without rendering the whole thing?

Yes — press Spacebar or Numpad 0 for a RAM preview, which uses cache bars and adaptive resolution. Loading the whole composition for a four-second title is unnecessary. Note that the project estimates preview feel at 55% (UI parity), with reported stutter and slow scrubbing, so check keyframe values numerically rather than trusting how smooth the playback looks.

Do I need plug-ins or anything else installed?

No. Nothing from Adobe is required, plug-ins are not supported anyway, and codec handling is built in — the encoders are pure Rust with no FFmpeg dependency. Lottie import and export is part of the app rather than a plugin.

06 / Keep exploring

What to try after your first render

Keep first-title.ecproj as a working example. Duplicate the layer with Alt-drag instead of rebuilding, and change one variable at a time: shorten the entrance, use a larger text size, or animate Opacity after the Position movement works. Export each variation under a new filename so you can compare them side by side.

Three directions that go further than this exercise:

Put the animation on the web. File ▸ Export ▸ Lottie JSON… writes a composition — including precomps, mask and shape layers, eased and spatial keyframes, track mattes, blend modes and time remapping — as .json or .lottie, and lists anything Lottie cannot express. File ▸ Import ▸ Lottie… opens one back up as a new composition. In After Effects this needs a third-party plugin; here it is built in.

Make the motion run itself. Expressions are JavaScript against the After Effects object model — wiggle, loopOut, thisComp.layer("…") — with an inline editor and the pick-whip. A looping title is loopOut() on one property.

Drive it from a script. Every menu action is a command with an id, reachable from a command line, a JSON control channel or an MCP server. If you build titles in batches, effectcraft-cli renders the same queue without opening the window.

When you finish this EffectCraft tutorial and outgrow the exercise, test your own footage and output settings in the version you plan to use — a practice render proves the workflow, not every production case. If you have not decided whether EffectCraft fits your work at all, the EffectCraft vs After Effects comparison puts the documented differences side by side.

Keep exploring

Sources: README; gap assessment and UI parity. Interface actions remain to be verified in the app.